Is Ryobi Still the Right Generator for Us?

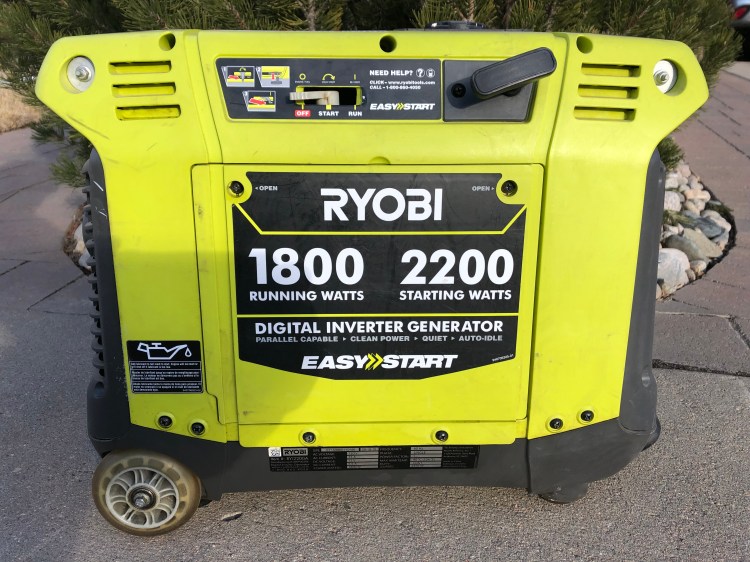
Eight seasons ago @sowewentuncle and @sowewentdad quickly decided on Ryobi generators for our boondocking adventures. Since we travel together most of the time, we each bought one generator at @sowewentdad purchased the parallel kit. @sowewentuncle’s truck camper load is light enough that we just hook the generators up the trailer and then run a 20 A power cord over to @sowewentuncle’s truck camper. It has worked out very well.

Comparison

While the Ryobi generators are still working great for us. @sowewentdad wanted to take a look at what is currently out there and repeat our quick comparison. With so many generators out there, this comparison is being kept simple with the generator we chose (Ryobi), the industry standard (Honda), and a powerful generator @sowewentdad sees at Cabela’s (Champion).

Ryobi 2300 WHonda EU2200iChampion 4000 W RV Ready
Running Power1,800 W2,200 W13,500 W
Max Power2,300 W2,200 W4000 W
Outlet Type120 V 20A120 V 20A120 V 20A, 120 V 30 A
Parallel CapableYesYes2Yes
Noise Level57 dB57 dB64 dB
Weight52 lbs47 lbs82 lbs
Dimensions22 x 19 x 12.5 inches20 x 16 x 11
inches
20.5 x 17.9 x 17.7 inches
Fuel Capacity1.2 gal0.95 gal2.9 gal
Run Time8 hours at 1/2 load3.2 hours at rated load, 8.1 hours at 1/4 loadUp to 17 hours
2023 Product Information
1 – See Honda vs Ryobi, Second Question
2 – See Honda vs Ryobi, Fourth Question

Champion vs Ryobi:

Since a single Ryobi generator doesn’t run the microwave or air conditioner; @sowewentdad has wondered whether it would be better to get a single Champion generator. Physically, the generator is not much larger that a single Ryobi and is much smaller than two Ryobis needed to equal the output power. Also, the Champion is only 1.5 times the cost of a single Ryobi and just a hundred dollars or so more than a single Honda. That is a significant cost savings over buying two smaller generators. Third, the Champion oil drain/fill is on the outside versus inside like the Ryobi and Honda making oil changes much less messy. However, there are two big drawbacks with the Champion generator.

The first is weight. The Champion starts out 30 pounds heavier than the Ryobi without fuel. With fuel the Champion is 46 pounds heavier coming in around 100 pounds. Even if @sowewentdad was in peak condition; that much weight requires two people to lift it in and out of the truck or move it anywhere the wheels do not work well. Whereas at 60 pounds fully fueled, the two Ryobi generators can be handled one at a time by a single person; albeit they are still heavy.

The second is noise level. To generate more power, it takes a larger engine. While 7 dB difference doesn’t seem that much on paper; that means the Champion generator is four times louder than the Ryobi or Honda. (The sound level doubles every three dB). That means the Champion is significantly louder than the Ryobi. For our own peace and to be a better neighbor at the campground, we prefer having a quieter generator; especially one that is 4 times quieter.

So, while having only one, much less expensive and more powerful generator is appealing. The weight and noise level of the Champion generator are major detractors. For now, we plan on sticking with the smaller generators. For us, the Ryobi wins.

Honda vs Ryobi:

This is a much closer match up. The Ryobi is about three-quarters the cost of the Honda which makes the Ryobi much more attractive, especially when they look so similar on paper. There are four things that make @sowewentdad question the choice of Ryobi over Honda:

First, Honda engines have a great reputation for running well for a long time. Will the Ryobi be as reliable? We are not sure. At the lower cost, @sowewentuncle and @sowewentdad concluded we could take the chance of having to replace them sooner, but still come out ahead in the long run.

Second, does the Honda have better output power. The Ryobi has a running power of 1800 W with a max, startup power of 2300 W. The Honda states it is 2200 W. At home, @sowewentdad‘s 120 V, 15 A house circuit can run the trailer air conditioner while we load (if the batteries are charged). However, the Ryobi cannot start the air conditioner. This is most likely due to the surge required at startup that the generator just can’t support. What we have not been able to explain is why the Ryobi generator cannot operate a 700 W microwave in the trailer or the truck camper; something an 1800 W generator should be able to do. @sowewentdad has wondered if the Honda generator would have better power to support at least the microwave.

Third, is the Honda generator quieter? In 2016, when we bought our generators, the Honda was 3-4 dB lower than the Ryobi or about half as loud. Based on reviews at the time, we decided the Ryobi was quiet enough (as far as noisy motors go at the campground). Today they are similar in noise levels when running at full power, making it a tie between the Ryobi and Honda, with Honda probably being slightly better.

Fourth, would the Companion Model work for us? The new model of Honda generators require a companion model (EU2200IC) generator to support parallel operation and run a 30 A receptacle. This makes the parallel connection simpler and makes sense for a single owner that buys the set together. In this configuration, the Honda parallel cables are more streamlined than the Ryobi parallel cables. However, in our case, we purchased the generators separately to reduce cost and only combine them when needed (Hot boondocking trips or when we want to use the microwave). While not the end of the world, in our use case, one person would have the companion model that does not have the DC output or a second 120 V, 20 A receptacle. This puts the Ryobi slightly ahead of the Honda for us.

So, while the Honda generator has a great reputation, in our case the Honda only has a slight advantage over the Ryobi in quietness. In cost, performance, and practicality; the Ryobi is still better for us.

Conclusion

Very early on @sowewentuncle found the Ryobi generator able to support our needs. Over the last eight seasons, our generators have served us well. If we needed to replace them today, we still prefer the newest model Ryobi generator based on cost and weight.

Please take a moment to follow us on X, Facebook, WordPress, or Instagram to hear more from So We Went to The RV Show:

Or subscribe to receive email updates:

So We Went to the RV Show Blog contains affiliate links. By purchasing through these links, we get a small commission at no additional cost to you. As an Amazon Associate So We Went to The RV Show earns money from qualifying purchases.

So We Went to the RV Show Blog is not affiliated with The Home Depot or Cabela’s.

Oh Flat!

When I headed to the storage lot to pick up the trailer for our trip to Estes Park, I expected to have to add air to the tires, so I brought the generator and air compressor.  Unfortunately, I found that one tire needed more than just a little air, it had gone completely flat since out trip to Eleven Mile State Park. This was an unpleasant surprise since this was a last-minute pick up of the trailer to pack and leave that day.

After a little bit of inspection, the cause of the flat was quickly determined to be a nail in the tire:

After finding the cause of the flat, I tried adding air in the tire so I could take it over to Big-O to have it repaired.

Unfortunately, the tire was not holding pressure, so I decided to use this as an opportunity to practice changing a tire on the trailer. Luckily, I had not had to do this before and I wanted to make sure I had all the right equipment with me in case this was needed on the road.

Step 1: Loosen Lug Nuts

Before lifting up the tire, it is easier to loosen the lug nuts. The weight on the tire allows the lug nut torque to be broken using a lug nut socket, extension, and breaker bar. The objective is to just break to torque of the lug nuts, not take them off or over loosen them. The tires still have the weight of the trailer on them.

Note: You can use a lug nut iron to remove the lug nuts. I have found the combination of the lug nut socket, extension, and breaker bar to work the best. The extension gets the tool away from the tire and trailer body while the breaker bar provides more leverage making it easier to loosen the lug nuts.

Step 2: Lift the Tire

I have a Trailer-Aid tire changing ramp to use under the good tire. Because this is a tandem axel trailer, it can be difficult to life the tires of the ground using jacks, especially since the Jayco manual recommends against jacking under the axel and using the frame instead.

While I have a Trailer-Aid, leveling blocks could also be used to lift the tandem wheel.

Since I was alone during this process, I had used a set of tools outside the driver door to mark how far forward I needed to move the truck to pull onto the Trailer-Aid. Any reference will do. I did end up pulling a little too far on my first attempt, but that was easy to correct.

After getting the good tire onto the Trailer-Aid, I chocked both wheels on the other side of the trailer.

Step 3: Remove the Tire

With the flat tire lifted up, I was able to take the lug nuts off and easily get the tire off. With the tire off, I loaded it up in the truck to get it repaired at Big-O.

Step 4: Tire Repair

Big-O was able to quickly plug the nail hole and have the tire ready to re-installation.

Step 5: Re-Install the Tire

Now I thought I was in the home stretch of getting the tire back on so we could head to Estes Park. Even though the tire easy came off when it was flat, it was not too tall to go back on the hub. I initially tried letting air out of the tire to see if I could get it to go onto the hub. However, I wasn’t able to let enough air our without getting so low I would run the risk of unseating the tire to get it onto the hub. So I had to try something else.

I decided to get the bottle jack out of the truck and use it to life the axel up high enough to get the tire onto the hub. While Jayco recommends not putting a jack under the axel, I decided that since the Trailer-Aid was supporting the other tire, there would be significantly less force being applied by the bottle jack to the axle than if this was the only way the axle was lifted.

The bottle jack worked great and I was able to get the tire back on the hub. In retrospect I could have used the leveling blocks to build a higher lift for the tandem tire, but since the tire was off I couldn’t change the configuration. Perhaps I will use the blocks next time if I need to change a tire.

Step 6: Install and Torque the Lug Nuts

Using a torque wrench, extension, and lug nut socket; I tightened the lug nuts up in a star pattern with increasing torque from 50 to 95 then finally 115 ft-lbs. This walks the wheel onto the hub and ensures an even torque with all the lug nuts.

Note: If you don’t normally carry a torque wrench, you can use the breaker bar or lug nut iron to re-install the lugs and tighten them. You will want to take extra caution to check that the lug nuts are tight during the rest of your journey until you can use a torque wrench or have a tire shop properly torque your lug nuts for you.

Step 7: Remove the Lift

With the tire and lug nuts secured, the trailer can be backed off the Trailer-Aid (after removing the chocks on the other side first).

Conclusion

It wasn’t too hard to change a tire on a tandem axle trailer and it was a good experience to practice in the storage lot rather than the side of a road. I recommend practicing with the equipment you normally carry to make sure you are ready to change a tire if needed.

The biggest surprise I had was the Trailer-Aid lifted the flat tire high enough to be removed when flat, but it was not high enough to put the repaired tire back on. Our Trailer-Aid is older and does not have the “Plus” feature that provides an additional 1 inch (5 1/2 inches total) to lift the good tire. I am not sure 1 inch more would have been enough though. However, I do like that the Trailer-Aid cradles the good tire to help reduce rocking once lifted.

@sowewentdad

Please take a moment to follow us on X, Facebook, WordPress, or Instagram to hear more from So We Went to The RV Show:

Or subscribe to receive email updates:

So We Went to the RV Show Blog contains affiliate links. By purchasing through these links, we get a small commission at no additional cost to you. As an Amazon Associate So We Went to The RV Show earns money from qualifying purchases.

So We Went to the RV Show Blog is not affiliated with Big-O.

Finally Installed Battery Disconnect Switch!

In storage the CO2 detector, radio, and control boards continuously drain the batteries. Using two boat/RV batteries, these vampires would drain the batteries in less than two weeks. Upgrading to Duracell DURCD12-80P AGM batteries extended the time to about 17-21 days. Allowing the batteries to drain below 50% will shorten the life of the battery and, especially if it drops below freezing, can kill them.

During the first couple of seasons, we worked hard to get the trailer out every two weeks. However, as SoWeWentKids have gotten older and have competing activities, this is not practical. When we had to exceed two-week intervals, @sowewentdad would have to go over to the storage unit with the generator and charge the batteries. Since @sowewentdad could work from the trailer, it wasn’t too bad (except that our single generator doesn’t run the air conditioner). All throughout the season, there was always a nagging concern making @sowewentdad keep in mind when the batteries needed to be charged and, especially in the shoulder seasons, will the temperature drop below freezing.

As we have started trading off shorter trips for longer adventures; the intervals between trips have increased. Now we are targeting about one trip per month instead of two and sometimes three. Even though we are out less with the trailer, it has been difficult for @sowewentdad to get over and charge the batteries because of the additional activities with American Heritage Girls and Cub Scouts. Several times @sowewentdad didn’t make it over in time to charge the batteries resulting in them being drained and most likely shortening their life.

I had been hemming and hawing about multiple solutions to this problem:

  • Just disconnect the batteries when I know I will not be using the trailer.
  • Install a battery disconnect switch.
  • Get a solar trickle charger that stays connected at the storage lot.
  • Install solar panels to use while boondocking and maintain the batteries while in storage.

Taking the straps off the Camco Battery Box to access the bolted terminals of the Duracell DURCD12-80P AGM batteries was not appealing. That was a lot of work that @sowewentdad didn’t want to do more than once a season when he removes the batteries for the summer.

Batteries Installed and Connected

Installing permanent solar panels on the roof would be great. It would help with boondocking and keep the batteries charged while in storage. However, this is a much more expensive option and I already have a generator for boondocking. Ultimately, not having a plan in place and wanting to have a solution within two weeks before @sowewentdad‘s cochlear implant surgery nixed this idea; for now.

While our Jayco originally came “solar ready”; I feel this is a gimmick from Jayco. “Solar Ready” meant nothing more than adding a short wiring harness from the batteries to a proprietary connector for a solar array manufacturer. This idea being, you buy the proprietary suitcase solar arrays that have to be set up next to the trailer and plug into this proprietary harness. While I have seen some people use these solar arrays at storage units, I didn’t want to have another item I have to set-up and tear down every time I went in and out of storage. Not to mention I removed this “Solar Ready” harness after The Great Meltdown incident.

A third solar option is a Solar Battery Charger and Maintainer. I have used these on sail boats before and they work pretty well. They will easily maintain the batteries while in storage and I have seen a few trailers with these maintainers in the storage lot as well. This would probably be another item that has to be set-up/taken down each time the trailer put in and taken out of storage; although it probably wouldn’t be too hard to permanently mount a panel. However, I noticed these maintainers didn’t fair too well in the wind on the sail boats and I was concerned about well I could mount the maintainer for travelling down the highway at 65 miles per hour.

That left me with the battery disconnect switch. @sowewentuncle recommended installing one of these switches during the first season, but between a fear of modification to the new trailer and being a little overwhelmed with the rest of the trailer life learning curve I put it on the back burner. As mentioned above, our trip cadence was sufficient to keep the batteries charged and the couple of times I had to use my generator between trips wasn’t too bad. Now, after draining the batteries a couple of times during the previous season, @sowewentdad‘s cochlear implant surgery quickly coming up, and a snowstorm coming during the cochlear implant surgery; it was time to install a battery disconnect switch.

Note: I could have just pulled the batteries off to keep the out of the snowstorm; but if I wanted to preserve our upcoming trip soon after the cochlear implant surgery, I had to leave the batteries on because I had a lifting constraint for the first couple of weeks after the surgery.

After a search on Amazon, I decided on two different battery disconnect switches:

I originally wanted the Blue Sea Systems Battery Switch On/Off AFD. This switch looked like the best for water proofing and durability. However, I was impatient and wanted a switch before for the upcoming weekend so I compromised with the Nilight – 9001BA Heavy Duty Battery Power Disconnect.

I decided to go with the High Current Battery Disconnect Switch because I wasn’t sure how much amperage was needed to go through the switch. However, after I had the switch installed, I did some quick math (and looked at the other fuses on the system) and realized the cheaper, lower current Battery Disconnect Switch is more than sufficient for a travel trailer. Oh, well at least @sowewentdad got off his duff and installed a switch.

This installation was relatively simple, but it did take @sowewentdad and @sowewentson a couple of hours to complete the work. Here is the link to the SWW Upgrade: Battery Disconnect Switch for step-by-step instructions to install the disconnect switch.

It was a good thing @sowewentdad installed the battery disconnect switch. @sowewentdad needed more than a couple of days of recovery after surgery prior to headed out to Cheyenne Mountain State Park and it was three weeks before taking the trailer out of storage again. Having the disconnect switch installed added a significant piece of mind for the rest of the summer where we several of our trips had 3-4 weeks between them as American Heritage Girls and Cub Scout trips filled in our normal family weekends. It also helped us push well into November for our latest season trip we have taken to date, even with temperatures dropping into the low teens/high single digits just before leaving on our trip. Every time I checked the batteries coming out of storage, they were at full charge.

Note that while the battery was always at full charge, even after a nine week pause before our November trip to Texas; @sowewentdad recommends pulling the batteries off for the winter months. Even an open circuit battery self-discharges over time and will be susceptible to freezing towards the end of the winter. @sowewentdad feels it is better to keep the batteries off the trailer and stored in a moderate climate (above freezing) during the winter.

When looking for our next trailer, I will be checking to see if it comes with a battery disconnect switch. Even if our next trailer comes without a battery disconnect switch installed, this will be a first season upgrade for the trailer. This has made storing the trailer so much easier through the active season.

@sowewentdad

Please take a moment to follow us on Twitter, Facebook, WordPress, or Instagram to hear more from So We Went to The RV Show:

Or subscribe to receive email updates:

So We Went to the RV Show Blog contains affiliate links. By purchasing through these links, we get a small commission at no additional cost to you. As an Amazon Associate So We Went to The RV Show earns money from qualifying purchases.

So We Went to the RV Show Blog is not affiliated with Duracell or Camco.

@sowewentdad and @sowewentmom are registered, volunteer leaders with American Heritage Girls and receives no compensation from American Heritage Girls.

@sowewentdad is a registered, volunteer leader with Cub Scouts and receives no compensation from Boy Scouts of America.

OK, So We Got a Little Busy

So, blogging takes time and we got a little busy. In April of 2022 we had every intention of staying up to date on all our new adventures and catching up on the old ones. With our new spare tire cover we were on the road again last spring. We collected a ton of material from our big, May after school trip to Leadville, CO while touring the mining region; then promptly fell behind from there.

As SoWeWentKids are getting older, the summer calendar is getting very full. Even with adding more tent camping for American Heritage Girls and Cub Scouts (16 tent camping nights) and SoWeWentDad going through cochlear implant surgery; we accumulated 26 nights of camping, covering almost 4000 miles while enjoying new and old experiences.

This summer we went to:

  • Buena Vista / Leadville
    • Toured the Historical Mining District of Leadville
  • South Meadows Campground (Pike National Forest)
  • Bear Lake Utah
    • More Fantastic Boating Plus New Area Experiences
  • State Forest State Park
    • Finally Made It! We had to cancel this trip several times over the last couple of years. It was worth it!
  • Ridgeway State Park
    • More Four Wheeling in the San Juans (Not to mention fun lessons in Geology)
  • Yogi Bear’s of Estes Park (Jellystone)
    • Another fun Halloween Experience
  • Rayford Crossing RV Resort in Spring, TX for Thanksgiving with Family
    • Latest Season Adventure to Date! (And we learned a few things.)

We are really looking forward to sharing our experiences with you. Please take a moment to follow us on Twitter, Facebook, WordPress, or Instagram to hear more from So We Went to The RV Show:

Or subscribe to receive email updates:

On the Road Again …

After a slow start to the camping season due to @sowewentdad’s cochlear implant surgery and just a very busy end to the school year we are finally on the move. The new battery disconnect switch @sowewentdad installed before his surgery has really paid off with the delay in getting out camping and the freezing weather that blew through in April and May.

After our original tire cover fell off last summer, sorry for the litter Wyoming, we are excited to have our new spare tire cover that features our logo and blog address. Hopefully this will create opportunities to interact with people that pass us on the road. We would love to hear from you! If you see us on the road, please like the post or leave a comment.

Hams, we are tuned to 146.520 MHz and we would love to say hello.

We have a great Memorial Day Weekend planned to explore and learn about Colorado history. Out of an abundance of caution, and so we can enjoy out travels, we are holding off sharing our activities real time. We are looking forward to posting details of our adventures when we get home. Subscribe or follow us if you want to hear about the wonderful Colorado history we discover.

Thank you for your curiosity and taking the time to enter our long blog address.

@sowewentdad & @sowewentmom

Please take a moment to follow us on Twitter, Facebook, WordPress, or Instagram to hear more from So We Went to The RV Show:

Or subscribe to receive email updates:

Oh No! Snow!

Screen Capture from http://www.wunderground.com

The weather has been so nice since we were Ready to Flush! last month. There were two nights that touched freezing for an hour or so, but that was not enough time to damage a warm trailer. Especially with the installation of the battery disconnect switch, @sowewentdad wasn’t too worried about damage to the trailer for the previous, brief freezes.

However, now the wonderful weather of Colorado is throwing 7 inches of snow at us. While the temperatures are now expected to be at or just below freezing, the trailer is going to be at that temperature for 48 hours or so. Especially when predictions earlier in the week had temperatures reaching the mid-20’s, action was needed to protect the travel trailer.

So after a late day at the office, @sowewentdad loaded up the air compressor*, generator**, and tools to drain and blow out the fresh water systems before the Friday storm. Freezing weather always seems to come when I have to work at the storage lot at night instead of the day.

Winterization Tools: Air Compressor*, Generator**, and Socket Wrench

While I don’t think it will be cold enough for long enough to freeze the hot water heater, I wanted to be on the safe side. I went ahead and pulled the plug and drained the heater. This is a fast-moving storm and predictions have changed significantly over the last several days, so @sowewentdad didn’t want to take any chances.

While working on flushing the trailer freshwater system, I connected the generator to the trailer to charge the batteries. In reality, the batteries didn’t need a charge even though it has almost been two weeks since their last charge. This is due to the new battery disconnect switch @sowewentdad installed last month. This new battery disconnect switch has been wonderful and was also why the previous two freezes were less of a concern.

Using @sowewentdad‘s “Draining the Fresh Water System” procedure, I was able to drain and blow out the freshwater system in about 30 minutes at the storage lot. Draining the freshwater system is straight forward and provides some insurance against the impeding freezing weather. Using a procedure helps make sure I perform all of the work in the proper order; especially when I am in the storage lot in the middle of the night trying to go fast.

Draining the Fresh Water System Procedure

My “Draining the Fresh Water” procedure guides me through these steps:

  • Drain the Hot Water Heater (Make sure it is cold first)
  • Bypass the Hot Water Heater
  • Using gravity, open the low point drain and all the trailer faucets for an initial drain (this is a more important step when adding antifreeze to the system)
  • Then use the air compressor at 25 psi (no higher) to drive the water out of freshwater system.
  • Finally, drain the freshwater tank

I didn’t drain the black and grey water tanks. They still have the RV antifreeze in them from the winter, plus water from dewinterizing last month. I don’t expect these tanks to freeze in this weather.

The u-pipes in the grey water sinks and shower still have water in them. I am banking that there is enough room for the water to expand without damaging the drainpipes. For a full winterization I would have run RV antifreeze down the drains to protect this u-pipes.

Also, I didn’t add any RV antifreeze to the system. Driving out the remaining water with the air compressor will remove most of the water. The remaining water in the freshwater system will have room to expand as it freezes.

To help keep the black tank smell down, @sowewentdad filled the toilette bowl with water to about 1/3 full. This will seal the black tank from the trailer living area until it is needed in the near future. Once again, there should be enough water that it will not freeze at these temperatures.

With the freshwater system blown out, the crazy Colorado weather can go all over the place without risking damage to the trailer. Did you do anything to prepare your trailer for this late season snowstorm?

@sowewentdad

Please take a moment to follow us on Twitter, Facebook, WordPress, or Instagram to hear more from So We Went to The RV Show:

Or subscribe to receive email updates:

So We Went to the RV Show Blog contains affiliate links. By purchasing through these links, we get a small commission at no additional cost to you. As an Amazon Associate So We Went to The RV Show earns money from qualifying purchases.

* – So We Went to the RV Show Blog owns a Briggs & Stratton 3 Gallon Air Compressor, the Campbell Hausfeld 3 Gallon Air Compressor is similar although that we have not used it.

** – So We Went to the RV Show Blog owns an older version of the Ryobi 1800/2300 Generator.

Finally Posting So We Went To …

There is still a lot or work to be done, but we have finally published So We Went To … after the RV show. Click this link and you can take a look at our So We Went To … page.

A write up on each activity is going to take us a while. Take the time to follow us on Twitter, Facebook, WordPress, or Instagram so you can receive updates when a new write up has been posted.

Ready to Flush!

Screen Capture from http://www.wunderground.com

The snow predicted in the Spring Chicken post did not materialize, but it did go below freezing every night validating the decision not to dewinterize the trailer. Looking at this week’s forecast; all cold temperatures are staying above freezing which looks good for dewinterizing the fresh water system.

This does not mean another cold front will not come through before Mother’s Day, but it is looking good to dewinterize the trailer. However, it is possible to flush and sanitize the freshwater system and then blow out the lines so they can survive a light freeze if another one comes. Another option is to bring the trailer back to the house and run the heater for the few nights it drops below freezing if needed.

With the warm forecast, @sowewentdad will use Easter Monday to flush out and sanitize the freshwater system in preparation of our first trip. While @sowewentdad is working on flushing the freshwater system @sowewentmom will be wiping down the interior and getting the clean linens back into the trailer. It takes work, but the family excitement is building for the first trip of the season!

So We Went to the RV Show is not affiliated with Weather Underground.

Getting the Winter Grime Off

Admittedly, the trailer doesn’t get washed often enough. Most time I give it a good wash in the spring and then get too busy during the rest of the season. During the fall, I am rushing to winterize and I don’t want to be messing around with a cold, wet hose. However, the beautiful spring weather combined with the excitement of camping season invites me to get outside and wash the winter grime off.

The Adjust-a-Brush Telescoping Wash Brush really helps reach the top of the trailer quickly and easily. The telescoping handle is quick to shorten when working on the lower portions of the trailer reducing how far you have to stand back. The job is done quickly with a bucket of soapy water, a hose, and the telescoping brush.

The best part of the Adjust-a-Brush Telescoping Wash Brush is that SoWeWentSon can reach the top as well. With his help, washing the trailer is a lot more enjoyable. Perhaps the trailer will get washed more often this season since I have a great helper.

So We Went to the RV Show Blog contains affiliate links. By purchasing through these links, we get a small commission at no additional cost to you. As an Amazon Associate So We Went to The RV Show earns money from qualifying purchases.

Spring Chicken

Screen Capture from http://www.wunderground.com

This weekend looking like it will be beautiful to dewinterize the trailer. High in the low 70’s will be great for cleaning the inside of the trailer, restocking all of the supplies, washing the trailer, flushing the water system, and sanitizing the freshwater system. Camping Season is here!

But wait! Colorado still has at least one more frigid winter blast left in the forecast. Bringing in snow and several days below freezing. Especially with Wednesday dropping to the low 20’s, it is not a good idea to flush the freshwater system quite yet. Unless I want to park the trailer in front of the house and run the heater for a couple of days to prevent the lines from freezing. I guess I will wait until Easter weekend to flush the freshwater system. I love the game of Spring Chicken of when to dewinterize for the season.

Even though the trailer is still winterized, the batteries are now installed so I could tow it to the mechanic for the bearings to be repacked. While the batteries were fully recharged when I installed them two weeks ago, they have only received a little charge while going to and from the mechanic last weekend. Since then, the passive equipment in the trailer has been draining the batteries.

With the batteries I started using last year, the charge holds up for almost three weeks while in storage. However, they were pretty low and the charge dropped off pretty quickly. With freezing weather coming, this concerns me than the usual degradation of over discharging due to the electrolyte being more susceptible to freezing when discharged.

Now I have to decide if I am going to work on the trailer this weekend just to charge the batteries, if I need to charge the batteries at the storage lot, remove the batteries, or just take my chances with the weather. So the question is: Do I feel lucky and hope the days will be warm enough to keep the batteries from freezing over the 16-hour period below freezing this week?

I really need to install a battery cut-off switch on this trailer. Especially for this season since we have several gaps in our travel trailer trips for American Heritage Girls® and Cub Scout® activities that will drain the batteries if I don’t intervene.

So We Went to the RV Show is not affiliated with the American Heritage Girls®, the Cub Scouts®, or Weather Underground.